Follow Me on Pinterest

Instagram

Polka Dot Rosie

Pages

Showing posts with label Die Cutting. Show all posts

Tuesday, September 1, 2015

DS4J Anything Goes Challenge + Girly Girl Twist

Hi there!

Today starts a new month long challenge at DigiStamps4Joy! The theme is always Anything Goes, but there's also an added optional twist each month.  This month's twist is "girly girl"!  


I walked into this card with a different idea, but the frame I wanted to use didn't work out so well. so I decided to leave it out.  I love how delicate and feminine it turned out :)

One of my favorite things about digital images is how you can resize them however you see fit and they're very inexpensive. This image is only $2.50 in the DS4J store and I can print it whenever I want!

Supplies:

Strong Lady 8 by DigiStamps4Joy
Copic Markers (E 000, 00, 02, 53, 55; R 12, 14, 17, 20; YG 05, 09)
White Gel Pen
Oval Die
Pearls and flower from stash
Ranger Liquid Platinum Embossing Powder

Thanks for stopping by! Please stop  by the DS4J blog and see what the rest of my teammates whipped up this week.

Wednesday, January 14, 2015

A Thoughtful Donkey for DS4J'S #108 challenge: BINGO!

Hi there!

I've had this adorable donkey image in anticipation for DS4J's new challenge for weeks now and was SO excited to finally use it! This month's challenge is a Bingo challenge and I've gotta say that it was not as easy as I suspected, but it was definitely a lot of fun!  The idea is to use three spaces in a row on this Bingo board, whether they are up and down, across or sideways. 

The three spaces I choose for this card were in the top row: die cuts, flowers and faux stitching.


Isn't he just so cute?!  I struggled with a background and first tried watercolor to match the flowers, but watercolor never turns out as vibrant, so I nixed it. I love the background stamp that I used, although I often forget about it. I'm going to have to make an effort to remember to break it out more often!  

I considered a sentiment. Perhaps "Sorry I was such an ass", but I couldn't fit it in and I don't really have to apologize to anyone for anything (that I know of....) so I omitted it LOL. 

Thanks for stopping by! Please consider entering the challenge this month! And don't forget to like DS4J's Facebook page for your chance to win a digi just in time for Valentine's Day! 

I'm submitting to the following challenges:
Try it on Tuesday -- Using bright colors is my favorite :)

Tuesday, January 6, 2015

Party Time Tuesday January Challenge and Announcement!

Hi guys :)

I normally don't make New Years' Resolutions but last year I decided to set a few card making goals.  One of my goals was to get on a design team.  And I did. Not one, not two, but now THREE!  I'm THRILLED to announce that I have been chosen to be on Party Time Tuesday's Design Team! I found out a couple of weeks ago, but wasn't able to announce it until yesterday.  It feels so great to finally spill the beans :) They're a group of incredibly talented crafters and I'm very excited to be joining them!   If you're not familiar with PTT, I suggest you hop on over to their blog and check them out. They have monthly card challenges and the theme is always ANYTHING GOES! I hope you will consider joining us in this month's challenge :)

I decided to try something completely new for my first card as their DT member and I hope you like it! I made this for my dad who just got surgery on his knee....again :(  Thankfully this time he seems to be doing pretty well with recovery this time around!


The sentiment says "I hope you are clucking better soon" LOL  I know he'll get a kick out of it :)

Supplies:
Kraft and White cardstock
Peachy Keen Stamps Faceless Chickens; Chickie Faces; Sunny Side Up Sentiments
Recollections Stamp Set seen here (sorry, the packaging has been misplaced)
Copics (Y 02, 06, 08;  R 12, 14, 17; 20; YR 16; B 00; V 12)
Little Leaves Sizzlit Die
Spellbinders Shapeabilities Ribbon Banners Dies
Mama Elephant Creative Color Ink in Eggplant
Antique Linen Distress Ink
Cuttlebug Honeycomb Embossing Folder and Border
Martha Stewart Crafts Luster Glass Microbeads in Feldspar

Thanks for spending part of your day with me!

Wednesday, December 24, 2014

DigiStamps4Joy Challenge #107--Add Glitter!!

Merry Christmas Eve!  Today is the beginning of another challenge at DigiStamps4Joy and the theme is ADD GLITTER!!! I was very excited about this one since I just love glitter, so I whipped out my Wink of Stella and glitter cardstock and got to work! I decided to take a break from the Christmas cards this week to introduce you to this adorable image called Dozy Owl. I thought this would be perfect to use for a new mom because they're obviously overtired, but decided on an early Valentine's Day card for my husband instead.


The glitter on my owl is very subtle and can only been seen if the light hits it the right way.

Thanks for stopping by today! Please share your glittery creations with us and stop on over the blog to see what my teammates have come up with!

Submissions:


Wednesday, November 12, 2014

Challenge 104 at DigiStamps4Joy--Preparing for the Holidays / Fall

Happy Wednesday!  Today starts another challenge at DigiStamps4Joy, and if you haven't joined us yet, you definitely should. The challenges run for two weeks, so you have plenty of time to submit your creations! The theme for Challenge #104 is Preparing for the Holidays / Fall.  
Head on over to the blog to see what the rest of the awesome Design Team put together, and enter a card or two if you'd like.  We'd love to see what you come up with!


Supplies:
Copic Markers (YR 16, 18; YG 67; N 2, 4; E 25, 27)
Impression Obsession Small Grass Borders die
Colored Cardstock
Simon Says Stamped Curved Edge Die
White Opal Liquid Pearls
White Gelly Roll Pen


Thanks for stopping by!

Wednesday, October 22, 2014

White Embossed Hydrangea with Watercolor

Hello, friends! Today I wanted to share a beautiful card I made using watercolor and white embossing powder. I just love this card and think the simplicity of it is what makes it so beautiful.


I started off by rubbing my anti-static on white cardstock before stamping my hydrangea stamp with Versamark Ink and heat setting it with white embossing powder.  I colored the image with my AMAZING Koi Watercolor set using two shades of green and one shade of purple. I made different shades by adding more or less water, depending on what I wanted.  Adding more water will make the color lighter; adding less water will make it darker. I really do love this watercolor set.  It's compact but has a wide variety of colors that seem to last forever, and comes with a water brush and mixing tray.  It's a lot of fun to play with :)

After painting the hydrangea, I set it aside to dry for a couple of hours. I wanted to make sure it was nice and dry before die cutting it so the colors didn't smear. I have done that before and it was so frustrating because I have found no way to save it after the damage has been done! This die was very intricate and removing the paper was tricky on the parts that had little curly q's, so I had to be very careful and move slowly.  Using wax paper usually helps remedy this problem, but I didn't have any an hand, so I went without it. Mental note to use it next time for sure, just to make it a little easier :)

I covered my cardstock in lilac paper and adhered the die cut with dimensional adhesive. And that is that :)  It wasn't a complicated card, but many times, the simple cards are just as beautiful!


Neenah Solar White Cardstock
Spellbinders Nestabilities Majestic Elements Adorning Squares
Heat Tool
Dimensional Adhesives
Lilac Colored Cardstock
Koi Watercolor Pocket Field Sketch Box
White Embossing Powder
Hydrangea Stamp

Thanks for spending part of the day with me!

Friday, October 10, 2014

Retirement Card Using Watercolor and Copics

Hello,  hello! If you frequently follow my blog, you may remember me talking about my friends Nick and Angie at some point.  I love hearing from Nick because not only his he a great conversationalist, but he usually has a fun challenge for me.  He's the one that always says "Hey, I need a card for xyz. Can you do it?" 

Duh. Yes. Yes, I can.

For this card, Nick's childhood dentist was retiring. He also happened to be Nick's kid's dentist, so of course he thought fondly of the man.  He wanted a special card to send to him and the inside had to be roomy enough for a lengthy, yet beautiful, message. This fit the bill:


I love this little guy, especially on retirement cards. He's just adorable and the sentiment is so appropriate!   In the beginning, I wasn't exactly sure how I was going to make it a larger card. I didn't want too much going on in the background since I loved the image so much, so I decided to cut a huge piece of watercolor paper and try a watercolor background, and would worry about the size later.

I smooshed Broken China and Squeezed Lemonade Distress Ink on my craft sheet, then sprayed really liberally with water. It was a giant puddle at this point and the colors started to mix together. I put the watercolor paper in the ink and moved it around to make sure it had good coverage.  If I missed any spots, I just dabbed the white spots in more ink.  I let this piece dry for a while and started working on the little boy.

He's stamped on Nina Solar White cardstock and I matched the colors of his clothes to the colors in the background.  After it was all colored, I cut it out with a die and sat it aside.

For the card base, I folded an 8 12" x 11" piece of cardstock in half, then made sure that the edge of the die was just a little bit HIGHER than the fold of the paper so that it kept that shape when it was folded.  I then used the same die to cut out the watercolor paper and adhered it to the base.  It's always a good idea to move the die around or put the layers in place before you die cut it because the look with watercolor can vary so much. Since the die was higher than the card base, some of it was cut off, but that's OK because it's completely covered by the piece of watercolor paper and you'd never know unless you looked at the back.

Next I added the little boy to the watercolor and ta-da! Job well done! Nick was thrilled and since it was larger than an A2 card, he had plenty of room to write his message. 

Here is a list of my supplies:

Copic Markers (Hair: E50, 53, 55; Skin: E 000, 00, 02, R20; Pants: B 93,95,97; Shirt: Y 2,6,8; Car: YG 03, 05; Keys: YR18; Shoes: N 0, 2)
Distress Ink (Broken China and Squeezed Lemonade)
Nina Solar White Cardstock
Strathmore Watercolor Paper
Daddy's Shoes by Stamping Bella
Spellbinders Nestabilities Mega Die Set Labels 8

Thanks so much for stopping by! See you next week!

Saturday, September 6, 2014

Nautical Themed Baby Shower Card

Hello, hello! Today I'm sharing a card that I made recently for a nautical themed baby shower.  As soon as the word "nautical" came out of my friend's mouth, I knew exactly what I was going to do, and it turned out to be such a happy card....


Isn't that darling?!?!  The baby's name is going to be Liam, so it just made sense to name the cute little boat after him.  My initial plan was to use my Silhouette to cut out the sailboat, but it just wasn't turning out the way I wanted, so I decided to try using my dies and punches. First, to make the bottom of the boat, I used my printer to print "USS LIAM", cut the words out with a circle die, and trimmed about a third off before distressing it; I used a tiny circle punch for the little windows, and a 1" square punch for the sails, cut it in half, then trimmed until it looked the way I wanted.  The flag is the tail of a bow punch, and  I used a toothpick wrapped in twine (how's that for thinking out of the box?!?) to make the mast.  The mast was the trickiest thing on here. I had to glue like crazy to get the twine to stick to the toothpick, then let it dry overnight before gluing it on the card. Once it was glued to the card, I left it alone for a few hours to make sure it was really dry, then came back and put the rest of it together.  Because the mast stuck out farther than the rest of the boat, I used pop dots to make everything else line up with it.

I used a fun template from Kiwi Lane Designs to make the waves.  I just traced the lines on shimmery blue paper and fussy cut. The clouds and the sun are from one of my favorite manufacturers, Peachy Keen Stamps. They are adorable and so fun to work with!  The clouds are actually a background stamp, so that was the very first thing I did when making this card, then I added the waves just the way I wanted them, the sailboat, then the sun.

Here's my long list of products:
You Are My Sunshine by Peachy Keen Stamps
Cloudy Day by Peachy Keen Stamps
Robin's Egg by Colorbox Ink
Copics Markers (Y 02. 06, 08; R20)
Twine
Punch Ribbon Bow Medium by Martha Stewart Crafts
Memento Tuxedo Black Ink
Pumice Stone Distress Ink
Sponge
Assorted Cardstock
Mini Aspen Court Template by Kiwi Lane Designs
Tombo Mono Multi Glue
Neenah Solar White Cardstock
Mini Circle Punch
Spellbinders Standard Circles LG

Thanks so much for sharing part of your day with me!


Saturday, April 26, 2014

Shaker Card for Mama Elephant Photo Inspiration Challenge

Hi there!  I am super excited for today's post!  Mama Elephant is having a Photo Inspiration Challenge and (surprise, surprise!) I am taking it on! I absolutely love the photo that we are using as inspiration! Look at all the fun elements:


I love how bright it is and I was really drawn to the blue and green colors, so I came up with this fun watercolor shaker card entry:


How cute is this?!? I love the bunny peeking his head around the corner of the mason jar.  I am so happy with how this card came about even though those little hearts keep sticking on the sides LOL!  To make this one, I used:

Summertime Charm Stamp Set  and Lawn Cuts (Lawn Fawn)
Copic Markers
Memento Ink in Lady Bug
Peacock Feathers, Salty Ocean, Squeezed Lemonade Distress Ink
Strathmore Watercolor Paper
Copic Markers (T1, T2, T4, N4, N6, N8, RV25)
Sew Easy Floss
Transparency Sheets

Thanks so much for stopping by!


Sunday, April 13, 2014

Happy Birthday Chicken--PKC 14-05


Hello, hello!  I am SO SO SO excited to share this card with you!  Because I love challenges, I made a birthday card for this month's Peachy Keen Stamps sketch challenge.  In these challenges, participants are given a sketch and a few ground rules, and the rest is up to us.  Here is the sketch that we were given this month....


PKC 14-05

And here is my take on it:


Holy cuteness!! I just love it!  The inside reads "You are still a spring chicken"!  I'm really looking forward to giving this one to the birthday girl!

Supplies used:
Peachy Keen Stamps Faceless Chickens
Peachy Keen Stamps Chickie Faces
Peachy Keen Stamps Clucks Sentiments
Pumice Stone Distress Ink
Spiced Marmalade Distress Ink
Martha Stewart Traditional Scallop Edger
Nestabilities Classic Oval Dies
Cuttlebug Swiss Dots Embossing Folder
Crop-a-Dile Corner Chomper
My Mind's Eye Card Stock
Neenah Solar White Card Stock
Copic Markers (Y 02, 06, 08; B 04; R 12, 14, 17, 20; Y 36)


Thanks so much for stopping by!

Friday, March 21, 2014

Masculine Birthday Card Using DIY Stencils--PS SPARKS Challenge

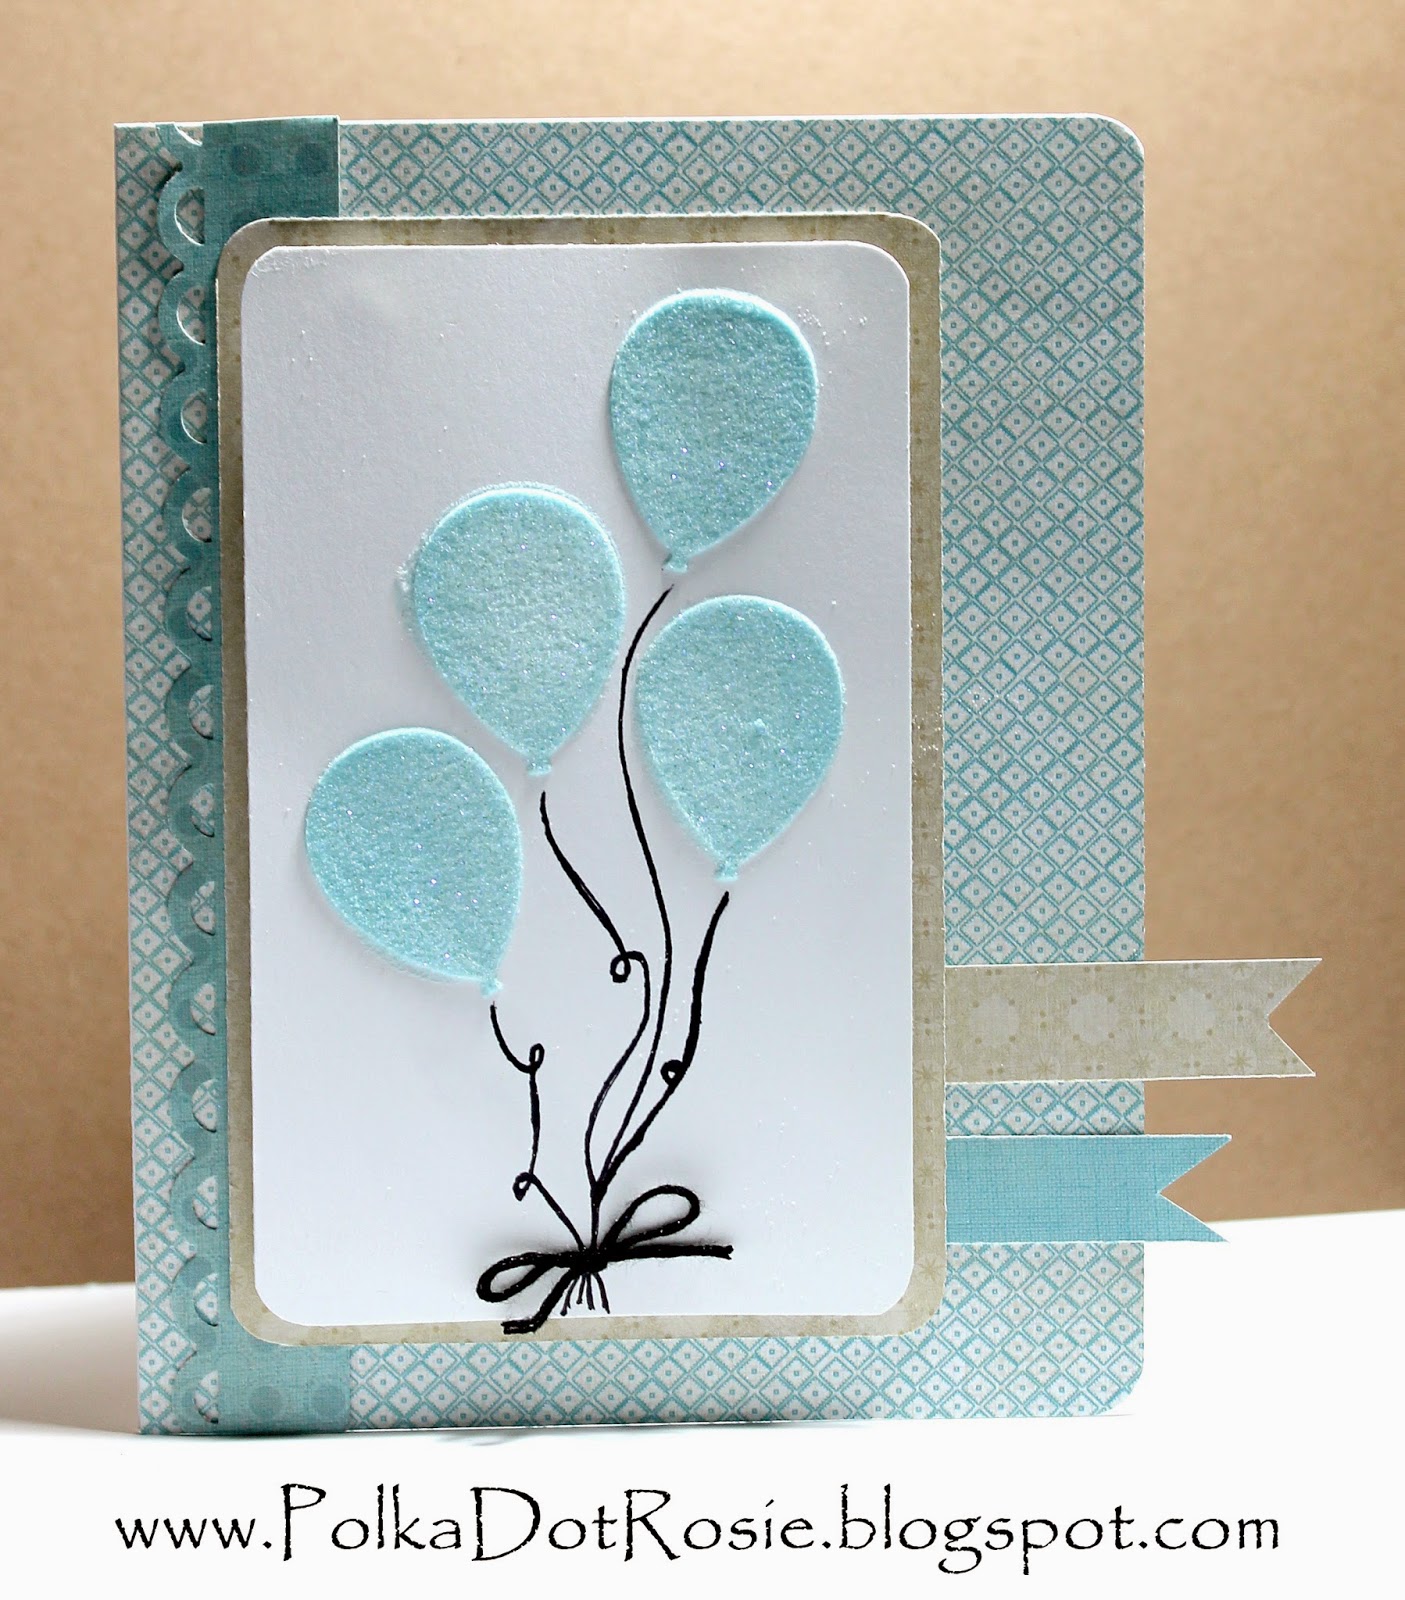
Hi there :) I didn't get to submit this card for the Paper Smooches Guest Designer Search like I had intended because some unexpected things popped up and I missed the deadline, so I decided to submit it for their SPARKS challenge instead! Since it is an "Anything Goes" challenge this week, I decided to push myself out of my comfort zone. I always struggle coming up with masculine cards, probably because I am a woman, so I decided to embrace it and challenge myself to try a new technique on a masculine card and the result is darling!  I'm so excited to give this to someone!

One of the techniques I wanted to try was making my own stencils, so I grabbed my balloon dies and went for it! I am so happy with how it turned out! I was initially going for a blue and yellow theme, but I colored the embossing paste myself and after falling in love with this shade, I decided to hold off on the yellow.


After stenciling the balloons, I sprinkled them with glitter embossing powder, then let them dry before using my heating tool.  The balloon strings were drawn on with a black Sharpie and I used black floss for the bow. I don't often make cards have a little something hanging off the side and I don't really know why. I should probably do it more often because I really like the way it looks. I walked into this card challenge with a challenge for myself and I'm really happy with the final outcome :)

Here is a list of supplies that I used:

Paper Smooches Balloon Dies
Sizzix Big Kick
Broken China Distress Ink
Dreamweaver Stencils Embossing Paste
Recollections Glitter Embossing Powder
Heat Tool
Black Fine Point Sharpie Marker
Fiskar's Apron Lace Border Punch
Sew Easy Black Floss
Pop Dots
Indie Chic "Nutmeg" 6x6 Paper Pad
We R Memory Keepers Corner Chomper

Thanks so much for stopping by! I hope you liked it :)


Saturday, March 15, 2014

You are Amazing Rainbow--PS April Guest Designer Search

Hi everyone :) We all could use a little rainbow in our lives, and this one happens to be another submission for Paper Smooches' April Guest Designer Search!  I used PS stamps and dies from my latest shopping craze for this project and had a great time playing around with everything!  It's such a happy card!  Now, I know it's a little dark, but there is a fair amount of detail to the white paper and it wasn't showing up on lighter pictures.  The darker picture showed the glitter, silver embossing and stars best. Enjoy!


The rainbow die is so cool, but it took a little bit of getting used to.  It die cuts all six colors of the rainbow at once and I didn't separate them until after I had cut all the colors I needed, so I ended up having to go through 36 tiny strips of rainbow and comparing sizes at first LOL Lesson learned! It was MUCH easier the second time around and I adore the final outcome. 

I embossed a white piece of paper with stars before using the rainbow die, then put the rainbow colors in the negative space like a puzzle. It was pretty easy to do and the pieces fit together rather nicely. I love sparkle and wanted to add a little more interest to the card, so I covered the clouds in silver Stickles. I didn't want the sentiment and rainbow to compete for attention, so I combined stamps from the Chit Chat stamp set and embossed "You are amazing" on vellum paper. I love how subtle it is...the silver looks so pretty with the silver glitter! Cute and simple! It makes me feel so happy!

Here are the supplies that were used:
Rainbow die (Paper Smooches)
Chit Chat stamp set (Paper Smooches)
Spectrum stamp set (Paper Smooches)
Star Embossing Folder
Versamark
Silver Embossing Powder
Heat Tool
Vellum Paper
Various cardstock
Stickles

Thank you for stopping by! I hope you enjoyed it!